At this point you already know about Salesforce and its main products. Now we will go a little deeper into how it works.
First things first: Salesforce architecture.
Salesforce’s architecture is based on a model of overlapping layers that work together to form a powerful and flexible cloud-based platform. Imagine these layers as different levels of a cake, where each one contributes to the overall functionality of the system.
At the lowest level, we find the trusted multi-user cloud infrastructure, providing a solid foundation for all operations.
As an intermediate level, we find Salesforce Platform, which acts as the heart of the platform, offering metadata-driven technologies and a wide range of services. Additionally, it includes artificial intelligence support and strong APIs for development.
All applications, both default and customized, are built on this platform, all equipped with powerful functionalities and a friendly user interface.
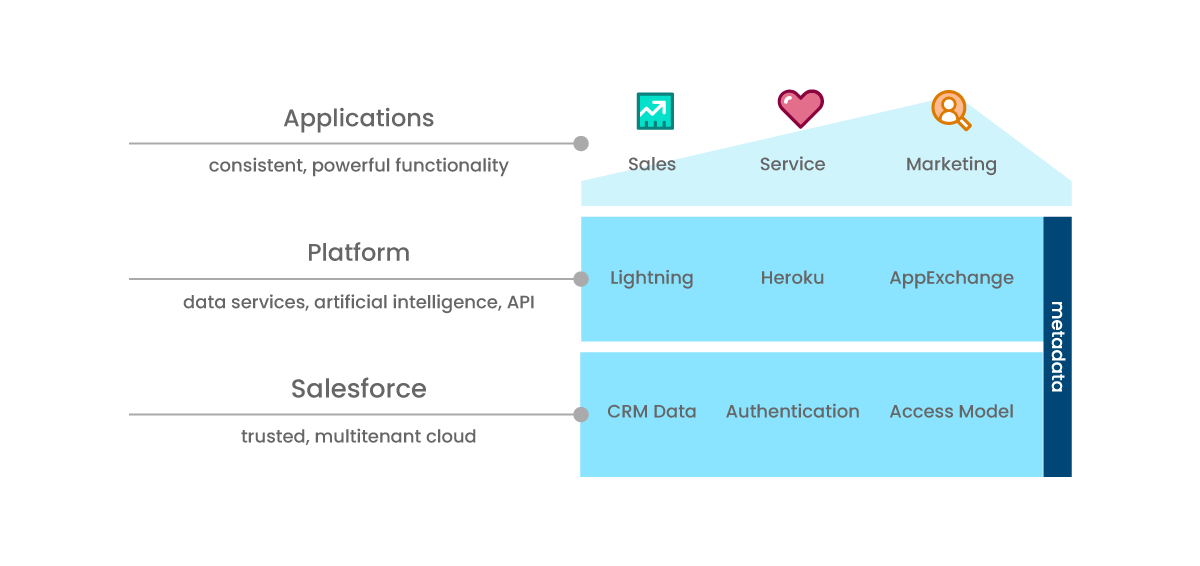
Finally, complete integration between all layers ensures that both technologies and functionalities are seamlessly connected and available to users. Together, this layered architecture allows Salesforce to deliver highly personalized and secure experiences for its customers, employees, and partners. All this, without the need to write too much code and with the ability to quickly adapt to changing business needs.
However, to fully understand this architecture you must know key Salesforce concepts:
- Trust Cloud: Ensures the security and trust of customer data by providing transparency into performance through trust.salesforce.com.
- Multi-user capability: Salesforce operates in the cloud like an apartment building, where each company has its space, but shares resources. This ensures equal access to computing power, data storage, core functions and automatic updates.
- Metadata: Metadata defines the structure and customization of the organization, encompassing all standard or custom configurations, functions, and computer code.
- API (Application Programming Interface): Also essential in CRM. It allows connection and exchange of information between different parts of the software, providing flexibility for unique and creative solutions.
Data access and visibility in Salesforce
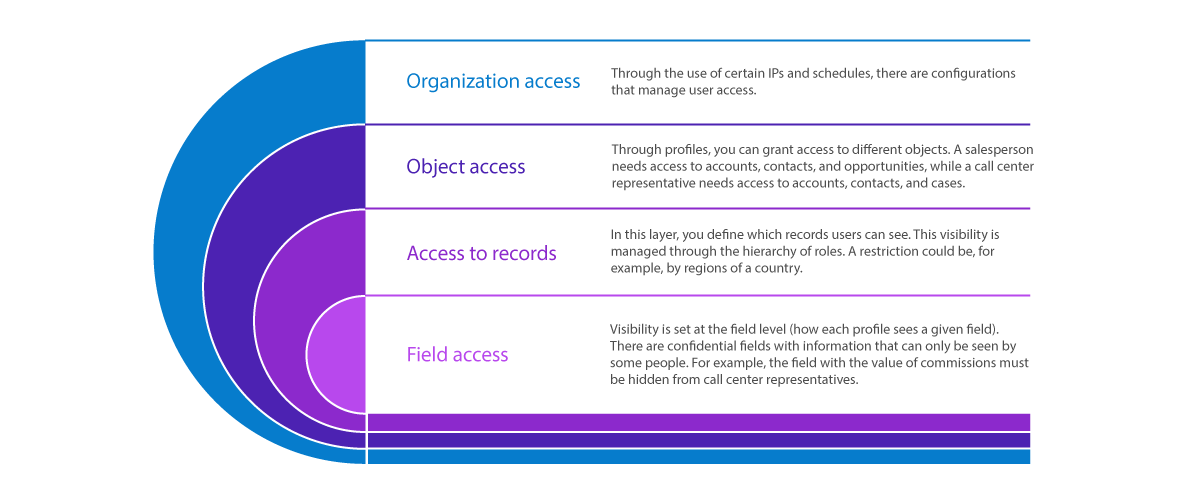
Thanks to Salesforce’s layered collaboration model, it’s easy to assign permission sets to users to determine who sees what in your organization. Security and convenience are balanced to reduce the risk of data theft and ensure easy access to necessary information. The platform allows you to control access to the organization, objects, fields, and even individual records, by combining different levels of security. This makes it easy to provide appropriate access to thousands of users without needing to set up individual permissions.
Manage access in Salesforce
Data access management strengthens security in Salesforce by allowing each user to see the information they really need. This is accomplished by using permission sets, permission set groups, and profiles to control which objects and fields users can access. Additionally, user roles and sharing rules are used to specify the individual records that users can view and modify.
Permissions
There are three Permissions in Salesforce:
- User permissions: Define the actions that users can carry out and what functionalities they can access.
- Object Permissions: Specify the basic access that users will have to create, read, modify, or delete records for each object.
- Field permissions: Specify the level of access to each field of an object.
It’s worth noting that configuring permissions and access is managed through the profiles or permission sets. For optimal configuration, you need to understand the differences between permission sets and profiles. Each user has a unique profile, but can have multiple sets of permissions. It is recommended that you use profiles to assign minimum permissions and then use permission sets to grant additional permissions as needed.
Profiles
Profiles define default settings for users. Each edition of Salesforce contains standard profiles. Additionally, you can create custom profiles or modify the standards, except in Contact Manager Edition and Group Edition. In these editions, you will only be able to assign standard profiles, but you will not be able to view or modify them, nor will you be able to create custom profiles. If you want detailed information about it, you can find it here.
Permission Sets
A permission set is a collection of settings and permissions that give users access to various tools and features. These sets expand users’ functional access without altering their profiles.
Permission Set Groups
Permission set groups in Salesforce are a way to organize related permission sets based on users’ role or function in an organization. Instead of assigning individual permission sets to each user, you can group similar permission sets into a group and then assign that group to the corresponding users. This simplifies permission management by allowing for more efficient and consistent allocation.
Additionally, permission set groups make it easy to update and modify permissions, and because related permission sets are grouped together, they can also be updated at once when needed.
Access to records
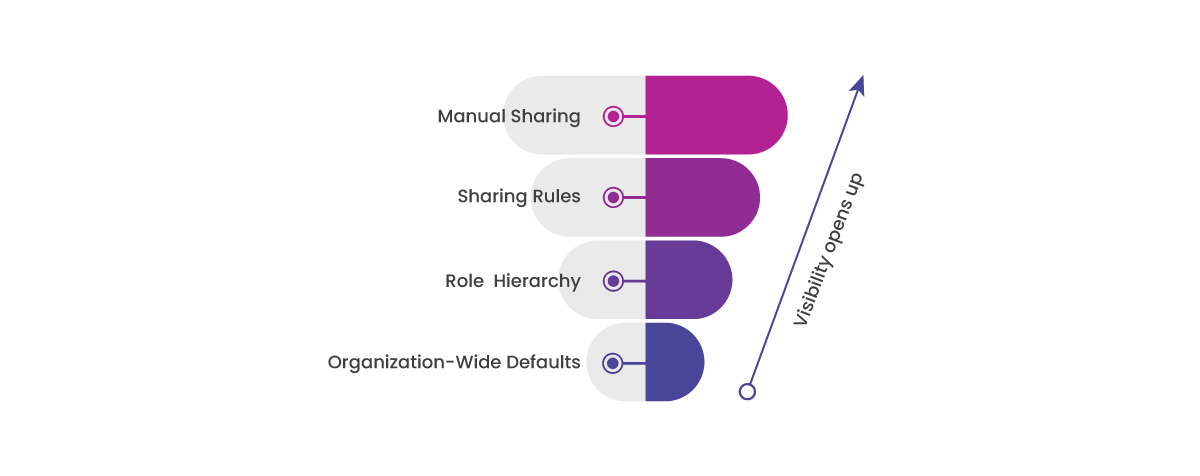
Record-level access is managed in four primary ways, listed in ascending order of access.
- Organization-wide default sharing: Sets the default level of access to records of other users in the organization. You can lock data at the most restrictive level and then grant selective access using other security tools.
- Role Hierarchy: Allows broader access to records using a hierarchical structure that ensures that higher users have access to the same data as lower users, in addition to their role. A territory hierarchy can also be used to share access to records.
- Sharing rules: Allows automatic exceptions to default settings for specific users, granting access to records they would not normally be able to see.
- Manual collaboration: Provides flexibility to share records with specific users who need access, even if they do not belong to predefined groups. This collaboration is not automated and must be managed manually by record owners.

The Salesforce ABC’s
Review the most common key terms that you’ll encounter at the very beginning of your Salesforce experience.
Other tools to manage access to records are:
- User sharing: Allows you to show or hide users from other users in the organization. It is based on membership in public groups, roles or territories.
- Apex Managed Collaboration: Allows developers to share custom objects. Only users with certain permissions can add or change collaboration on records for these objects.
- Restriction rules and scope: Restriction rules limit a user’s read access to records that match specific criteria. For their part, and scope rules define the criteria so that users see only the records relevant to them.
Navigating Salesforce
Navigation within Salesforce is very intuitive. However, we will help you get familiar with the platform.
First, let’s remember that there are two user interfaces in Salesforce: Classic and Lightning.
Homepage
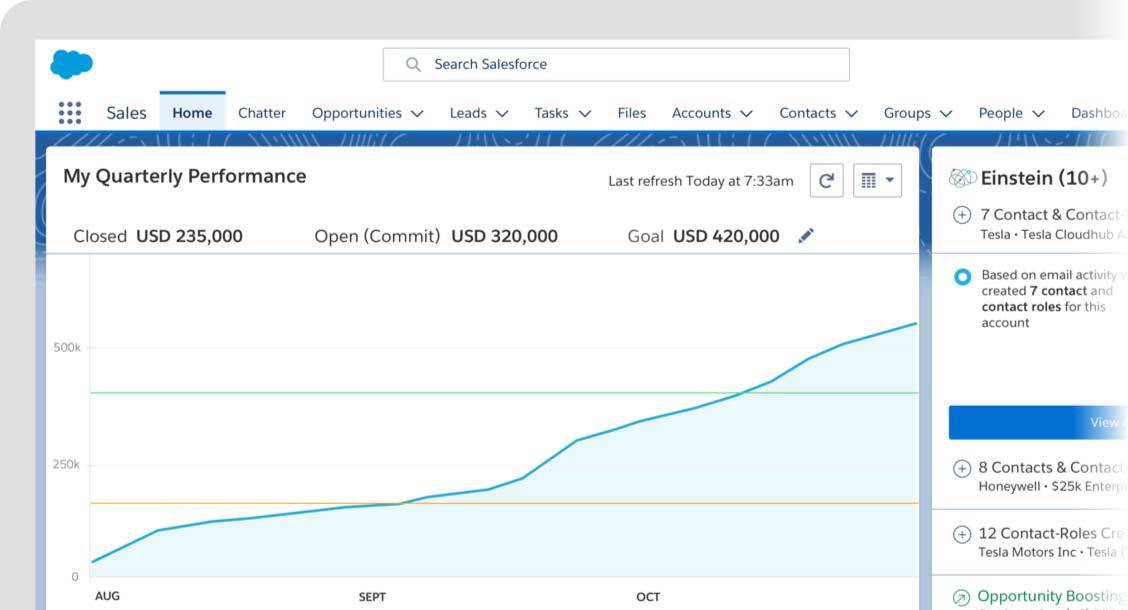
Once you log in to your Salesforce account, you will be on the home page. What you see will depend on the user interface (UI), editing, layout, and customizations that exist for your user.
With the Lightning Experience UI on your home page, you can see the following:
- Different dashboards, including quarterly sales performance, provide information of interest to sales users.
- An Assistant that shows a list with recommendations of actions that you could execute in your organization.
- A summary of accounts, opportunities, or leads that have recently signed up.
- Your tasks for the day and upcoming events.
If you work with Lightning Experience you can create custom home pages for different profiles, relying on the Lightning App Builder tool.
When you log in to Salesforce Classic you will have:
- Recently viewed items
- Your Chatter feed (News in real time)
- The Events Calendar
- The Recycle Bin
- Recommendations and notifications
Tabs or tabs
In addition to the Home tab, we have other tabs through which we can reach the home pages of “objects” such as Accounts, Opportunities, Campaigns, etc.
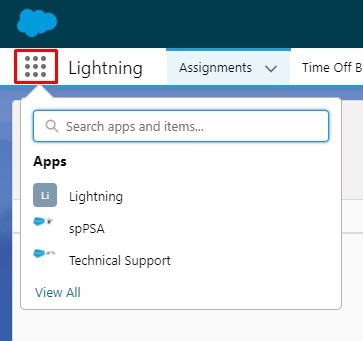
Application menu
You can find it in the top right corner of any Salesforce page. This drop-down menu is used to access the list of Applications available for your profile and navigate between them. In Lightning Experience, even if a user only has one app assigned to their profile, this menu will be displayed with the App Launcher. In Salesforce Classic, this menu is not displayed when users have a single application assigned to their profile.
Recycle Bin
In Salesforce Classic, this option is available at the bottom of the left sidebar for all its editions. In Lightning Experience, it is available in almost all editions and to access it or add it to your navigation bar you will have to do so through the App Launcher.
Contains items that have been removed less than 15 days ago. Salesforce administrators can see all data that has been deleted in the organization. Records in the Recycle Bin do not count towards your organization’s storage usage; but they do have a limit. Your Recycle Bin can have a number of records equivalents to 25 times the storage capacity in Mb of your organization. For example, if the capacity assigned to your organization is 2,000 Mb, you can have 50 thousand records in the trash.
Calendar Tab
You can use Calendar to control your schedule in Salesforce. With the different calendar views (month, day, week) you can easily move through different periods. Additionally, you can share your event calendar, view others’ events, etc.
Tasks
You can use the Tasks section to keep up with all the items on your to-do list. You also have the Kanban view to monitor the progress of your work.
Customize the navigation bar
This option allows you to arrange the tabs on your home page to your liking.

Search
You will find the search bar or search box at the top of the page. It allows you to optimize the search based on keywords. Also, from a global search you can filter by contact, accounts or opportunities and quickly find what you are looking for. The search box appears in each section of your organization and in each case the search will be restricted to it.
Recent Records panel
You can use Recent Logs to access recently viewed tabs or objects.
Notifications
Very useful for keeping you up to date on important communications from your Salesforce team or managers.

View Profile and Settings
To the right and left of the Notifications, respectively, you can modify your personal information. If you are an administrator, you can use these options for organization configuration and customization.
Help
Enter a keyword and Salesforce will guide you through content that will help you clear up your doubts. Salesforce Help even allows you to test your knowledge by asking questions that will reveal how you are doing with using the application. In addition, it offers you a tour of the main functionalities that you can perform within the application.

Salesforce 101: The Ultimate Cheat Sheet
So you’ve googled Salesforce to find out what it’s all about and might have realized it has a LOT to offer. Where do you even start? Well, we created this cheat sheet to guide you through it all.
Daily Activities Within Your Organization in Salesforce
Create records from object “home pages”
You can quickly create accounts, leads, tasks, notes, contacts and opportunities, from the home page of each object. While some objects (such as account) have special guidelines and considerations that you should be aware of, the process of creating a record is similar for all.
Simply click the button to the right of the object name of the record type you want to create, click New, and provide the requested information.
You can also create some records from the menu on the right in the navigation bar, by clicking the + button.

You must save your changes when you finish entering the values for your new record. If you navigate away from the page before clicking Save, your changes will be lost. You can also update information in existing records, such as accounts, contacts, or opportunities, to reflect changes in information or business relationship status.
Establish parent-child relationships between account type objects
First, create both records; father and son. Edit the child account and use the search icon next to the “Parent account” field to associate the account with a parent. This way you will get a view of the corporate structure of the organization. Finally click on “Save to” and the two will be unified.
Log a call
Record information about phone calls associated with a specific object, for example an account. You can incorporate the call as part of the activity log for that object. This is done from the “Activity” tab on the record details page. On the registration details page, you will find three more tabs including “Log a call”.
Schedule events using emails
Schedule an event by sending email from the “New Event” tab on the “Registration Details” page. This allows you to plan and schedule the sending of emails related to specific activities.
Send mail
Send emails to any registered contact by clicking the email address, which will launch the email manager configured on your computer.
Add notes and attachments
Attach relevant documents or make notes for specific records, such as accounts, contacts, or opportunities. This helps keep a complete record of the information associated with each record.
Track activities and records
Track relevant activities and logs to stay aware of important changes or updates to the platform. This may include tracking specific records or user activities.
Create and customize reports and dashboards
Create custom reports and dashboards to visualize and analyze important data. This may involve creating reports to analyze sales performance, opportunity status, or any other data set relevant to the business.
Export a report
You can select a report and click the Export to Excel button. Then follow the steps.
Transfer a record
Assuming you have transfer permissions, you can go to the “Record Details” page, select the desired record, and go to the “Change Owner” option. Then you choose a new owner from among the users in the organization and that’s it. You have the option to notify the new owner of this modification via email.
Collaborate in groups and chats
Participate in collaborative groups and chats to discuss projects, share information, and work effectively as a team. This may include collaborating on specific projects, solving problems, or coordinating activities between teams.
That is all for now! We hope this guide helps you understand how to get started with Salesforce. If you need additional help, please feel free to contact us by emailing hello@theskyplanner.com. Our experienced team will be happy to assist you along this wonderful Salesforce journey.
